So today I was successfully able to install DSL-N on my Hitachi Vision Plate. I used a 2GB compact flash card that I connected to my desktop computer using a IDE to compact flash adaptor. You could accomplish the same with a usb compact flash card reader. I downloaded DSL-N form http://www.damnsmalllinux.org/dsl-n/. Using Nero I burned the ISO that I downloaded and then booted from it the CD that i burned. To boot from a CD you must change the boot order in your BIOS. After DSL-N successfully booted from the CD I then did an install to the compact flash card.
DSL-N was able to boot on the Vision Plate it's slow but promising. I have not been able to get the touch screen to work as yet and there is no keyboard. I have to use my usb keyboard and mouse to navigate on the Vision Plate. I'm getting somewhere with this it's just taking some time. I noticed that there is a mobile version of Ubuntu that has not been release as yet (http://www.ubuntu.com/products/mobile).
Tuesday, May 6, 2008
Tuesday, April 22, 2008
Hitachi Vision Plate
I purchased a Hitachi PC5NR1-J5154J010 (Vision Plate) on eBay to use as a home automation unit and Internet terminal. Sadly this unit is discontinued and is no longer supported.
I decided to do some research on this unit and publish any information that I have found out about it. This is what I have found so far:
- Transmeta Crusoe 400MHz Processor
- 64MB on board expandable to 192MB
- Display 800 x 600
- 16bit Sound Blaster
- Midori Linux
- Wireless LAN 802.11b
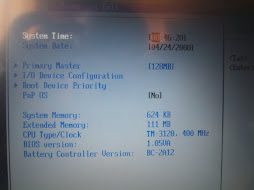
Through some trial and error I found out that if you hold the mail button down after turning the power on it will open up the Bios. To navigate through the bios use the blue Cursor Select Button. The mail button will allow you to exit a section. If you hold down the Internet button down after powering the unit on then it will bring up a boot menu. The boot menu gives you the options of:
1: +Hard Drive (the plus sign means that it is expandable)
-Hitachi XXM2.3.0-(PM) (expanded)
-Bootable Add-in Cards (expanded)
2:Usb Floppy
Holding the P1 Button displays the post (power on self test) information. If you have an external usb keyboard hooked up the you can press the F2 button to enter the BIOS. Note all of these buttons must be presses immediately after pressing the power button and they must be held down.
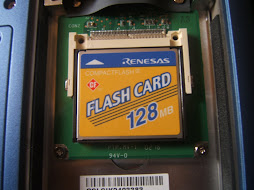
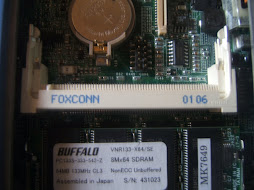
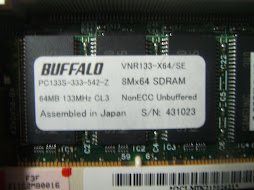
My unit has an Ethernet port and a modem port that are plugged with a rubber jack protector. I opened the unit and discovered that neither of these jacks are wired to the motherboard. My unit contains a 128MB Renesas compact flash card. For wireless it contains a Samsung wifi card. For ram there is a Buffalo PC133 64MB SDRAM chip. There is also a FOXCONN 0106 slot (I'm not sure what that is for).
I plan on trying out DSL on a larger compact flash card and seeing if that will boot.
Here are some links that contain some useful information relating to the Hitachi Vision Plate and Midori Linux. (these links are thanks to wizard1973 on tablet pc review)
Midori Linux Downloads:
ftp://ftp.kddlabs.co.jp/Linux/packages/midori
VisionPlate Review:
http://www.linuxjournal.com/article/6793
Midori Project Page:
http://midori.sourceforge.net/
Midori Project Page:
http://sourceforge.net/projects/midori/
Accessing Linux Filesystems in Windows:
http://www.linuxjournal.com/article/9449
Review:
http://www.linuxdevices.com/articles/AT4518860766.html
Hopefully I will be able to succeffully load DSL Linux (fingers crossed) I will keep you all up to date on my success or failures :)
I decided to do some research on this unit and publish any information that I have found out about it. This is what I have found so far:
- Transmeta Crusoe 400MHz Processor
- 64MB on board expandable to 192MB
- Display 800 x 600
- 16bit Sound Blaster
- Midori Linux
- Wireless LAN 802.11b
Through some trial and error I found out that if you hold the mail button down after turning the power on it will open up the Bios. To navigate through the bios use the blue Cursor Select Button. The mail button will allow you to exit a section. If you hold down the Internet button down after powering the unit on then it will bring up a boot menu. The boot menu gives you the options of:
1: +Hard Drive (the plus sign means that it is expandable)
-Hitachi XXM2.3.0-(PM) (expanded)
-Bootable Add-in Cards (expanded)
2:Usb Floppy
Holding the P1 Button displays the post (power on self test) information. If you have an external usb keyboard hooked up the you can press the F2 button to enter the BIOS. Note all of these buttons must be presses immediately after pressing the power button and they must be held down.
My unit has an Ethernet port and a modem port that are plugged with a rubber jack protector. I opened the unit and discovered that neither of these jacks are wired to the motherboard. My unit contains a 128MB Renesas compact flash card. For wireless it contains a Samsung wifi card. For ram there is a Buffalo PC133 64MB SDRAM chip. There is also a FOXCONN 0106 slot (I'm not sure what that is for).
I plan on trying out DSL on a larger compact flash card and seeing if that will boot.
Here are some links that contain some useful information relating to the Hitachi Vision Plate and Midori Linux. (these links are thanks to wizard1973 on tablet pc review)
Midori Linux Downloads:
ftp://ftp.kddlabs.co.jp/Linux/packages/midori
VisionPlate Review:
http://www.linuxjournal.com/article/6793
Midori Project Page:
http://midori.sourceforge.net/
Midori Project Page:
http://sourceforge.net/projects/midori/
Accessing Linux Filesystems in Windows:
http://www.linuxjournal.com/article/9449
Review:
http://www.linuxdevices.com/articles/AT4518860766.html
Hopefully I will be able to succeffully load DSL Linux (fingers crossed) I will keep you all up to date on my success or failures :)
Subscribe to:
Posts (Atom)